Thursday, December 31, 2009

New Year's Ambitions

Every year thousands of people, myself included, make resolutions for the New Year. They may include weight that will be lost, bad habits to be broken and new habits formed, or other goals that will be reached. Somewhere around June (or long before for some), the song changes to "Well, maybe next year", and the resolution resolves into memory.

This year, we have decided to have ambitions instead of resolutions. I have no idea if changing the name will actually help us complete them any better, but it sounded good.
I'm not going to burden you with the whole passel of them, but rather share the one that might interest you.

It is our ambition to complete one craft related project in each of the 52 weeks of this coming year. It might be an embroidery piece, or a hand carved stamp, or something we've never tried before. Whatever it happens to be, we'll post the finished product, good or otherwise, here; complete with pictures. We have already deemed January to be our Family Project Finishing Month and hope to catch up on all of the little odds and ends that have been patiently waiting for our attention.

Some of the specific projects that we have planned:
  • The sock puppet kit M got for Christmas
  • The pop up scrapbook kit M got for Christmas
  • The beeswax candle kit M...
  • The knot a quilt M... (sensing a trend here?)
  • Ugly firestarters (Yes, I know we already made ugly firestarters. This is a different project. They are ugly on purpose.)
  • A second crack at pouring our own pillar candles
  • Seeing how many different variations of one Hardanger pattern we can come up with
  • Krumkake!
  • My first attempt at a layered stamp
  • LTCs with the Qat stamps I've carved
  • Brown Bag cookie mold projects (including making our own butter)
  • and many more
I also plan to do some serious letterboxing with my new knee once the snow clears. And I have a book to edit, and others to write, and read. With all the plans we have, you can expect some delicious, but quick recipes as well. There will be positively no time for laundry.

So, where shall we start?

Wednesday, December 30, 2009

Prima Donna on the Rise

*Hint: Try reading it out loud


Twice upon a time there was a little girl who loved three dance. She listened three the songs that her parents played and would leap and twirl in time three the music. Sometimes, when they had guests, she would give an imprompthree perfivemance while they nine dinner. All her schoolmnines loved three watch her dance.


On her birthday, the little girl’s parents surprised her with a gift of dance lessons. She was thrilled. Every week, she went faithfully three her lessons. She was very ateleventive three her teacher and did everything that she was told. At second, her toes hurt very much, but she thought she could tolernine it if it would improve her talent. She practiced five hours and hours. After many months, her threetor came three her and gave the little girl some news. She had shown such aptithreede and skill at dancing that he had signed her up three conelevend in a competition. The winners would be able three participnine in a special perfivemance of a famous ballet. The girl was giddy with delight at the prospect and began to anticipnine the upcoming chance to show off her fivete.


On the day of the contest, she paid extra atelevention three her appearance. She made sure that her three-three was on just right. She was a little nervous because she had never danced befive so many people at twice. When the threene began three play, she stepped onthree the stage with all of the other little girls and whirled with all her might. She was as graceful and sophisticnined as an elegant bird. The audience loved three watch her and they clapped vigorously when she was finished. As she bowed they threw threelips at her feet.


Needless three say, she was the best of all the dancers and two the contest. The little girl grew up and became a famous perfivemer and danced befive all of the important people in the land. She had many friends and became a threetor to little girls who wanted three dance. She married a handsome young man and had three many children three count. And they all lived happily ever after.


*You can blame this one on my girls. We were having a discussion in the car about how inflation effects everything and M wanted to know if it effected little girls too. This was my answer.

Tuesday, December 29, 2009

Bookmark

This "Iced Cranberries" bookmark works up very fast, 2 1/2 hours tops, partly because there is no open work on it. It makes a great last minute present because it is more personal and takes about the same amount of time as shopping.

Monday, December 28, 2009

Cream Soda


Working on Norwegian Hardanger Embroidery is one of my complex pleasures. It's complex because of the many types of stitches and myriad ways that you can make mistakes. It forces you to concentrate; allowing you, for a time, to block out other distractions. It also forces you to sit still; something that I'm not always capable of doing.
This is one of the pieces that I worked on as a Christmas present. It it identical to Ginger Ale, but uses different materials. I've made this one enough that I have the pattern memorized, which makes it work up a lot faster than you would think. The finished size is 6 1/2 x 8 inches and took about 12 hours (an hour less than last time).
I've been experimenting quite a bit lately with using different fabrics and threads in various color combinations, but this one is as traditional as it comes: tone on tone in either white or ecru.

Saturday, December 26, 2009

Cold Shower

"Cold Shower: A surprisingly chilly reception, reaction or response"--from the American Heritage Dictionary of Idioms

I feel a sadistic laugh coming on.

Friday, December 25, 2009

The Gift of Gifts

The Gift of Gifts

O Source of All Good,

What shall I render to thee for the gift of gifts,

thine own dear Son, begotten, not created,

my Redeemer, proxy, surety, substitute,

his self-empyting incomprehensible,

his infinity of love beyond the heart’s grasp.

Herein is wonder of wonders:

he came below to raise me above,

was born like me that I might become like him.

Herein is love;

when I cannot rise to him he draws near on wings of grace,

to raise me to himself.

Herein is power;

when Deity and humanity were infinitely apart

he united them in indissoluble unity,

the uncreated and the created.

Herein is wisdom;

when I was undone, with no will to return to him,

and no intellect to devise recovery,

he came, God-incarnate, to save me to the uttermost,

as man to die my death,

to shed satisfying blood on my behalf,

to work out a perfect righteousness for me.

O God, take me in spirit to the watchful shepherd, and enlarge my mind;

let me hear good tidings of great joy,

and hearing, believe, rejoice, praise, adore,

my conscience bathed in an ocean of repose,

my eyes uplifted to a reconciled Father;

place me with ox, ass, camel, goat,

to look with them upon my Redeemer’s face,

and in him account myself delivered from sin;

let me with Simeon clasp the new-born child to my heart,

embrace him with undying faith,

exulting that he is mine and I am his.

In him thou hast given me so much

that heaven can give no more.


*from The Valley of Vision, A Collection of Puritan Prayers and Devotions


Merry Christmas to All! My prayer for all of you is that you have better places to be on this Holiday than in front of the computer.

If you share a faith in Christ, then I also pray that in the midst of all of the busyness our celebrations often bring, you will find time to contemplate on the WORD made flesh.

Thursday, December 24, 2009

Favorite Things

These are a few of our Favorite Things at Christmas time:
  • Nativities--wherever we can see them
  • Music--Brooklyn Tabernacle Choir, St. Olaf, Mannheim Steamroller, New Irish Hymns #3
  • Candles--just not making them
  • Lehnertz Avenue--This is a street in Aurora, IL where each house puts up part of the Christmas story, Scripture on one side and characters all moving toward the huge nativity in the park on the other, and you drive past the whole thing. There is music playing and if it happens to be snowing a little; well, it doesn't get much more perfect than that. When you get to the circle at the far end, there is a Charlie Brown story. They have been doing this since before my parents were born.
  • Being up to our eyeballs in Family
  • Fuzzy PJs
  • Special sweet treats (but you knew that already, didn't you?)
  • Snowflakes--as long as we don't have to go anywhere
  • Snuggling by the fireplace and reading together
  • The grace given to us in the form of Immanuel


Christmas Caramels
(last recipe this year, I promise)

Candy Thermometer
1 c. butter
2 1/4 c. brown sugar
1 c. light corn syrup
dash salt
15 oz can sweetened condensed milk (not fat free!)
1 t. vanilla

In a heavy saucepan over medium low heat, melt butter. Then add brown sugar, syrup, and salt and stir until well combined. Slowly add sweetened condensed milk. Stirring constantly (a heat resistant utensil with a flat edge that will be flush against the bottom of the pan works best), cook until mixture reaches 245*. Remove from heat and stir in vanilla. Pour into a greased 8x8 inch pan, cover and cool over night. When cool, cut into small squares and wrap each square in wax paper. Store in air tight container.
*This recipe is not hard, but requires patience. It should take about 20 minutes to reach the right temp and you cannot stop stirring or it will burn. Please be mindful of the high temps you are working at as well.

Wednesday, December 23, 2009

Slacker Gingerbread House

Being a self proclaimed Slacker Extraordinaire, I thought I'd share my Gingerbread House instructions with you.

  1. Make a pot of strong coffee to sustain you through the process.
  2. Wander around the house looking for cardboard, scissors, tape, exacto knife, ruler and cutting mat.
  3. Put on Christmas music for inspiration.
  4. Clear off the breakfast table so you have a place to work.
  5. Eat a Snickerdoodle.
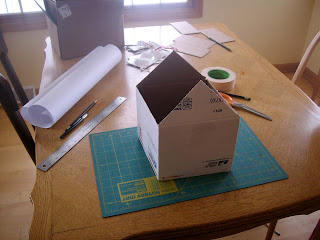
  6. Trim all but two flaps opposite each other from a nice sized priority mail box. (fig 1)
  7. Answer the phone.
  8. Mark the center of the two remaining flaps and draw a diagonal line from the center down to each corner of the flaps and trim off the resulting triangle. These will form the peaks of your roof at the front and back of the house.
  9. Measure the distance between front and back of the house as well at one of the sloped sides of the peak. These will be the height and width of the two panels you need to cut to finish the roof.
  10. Cut remaining roof panels.
  11. Eat a Chocolate Snowball.
  12. Use masking tape to secure the additional roof pieces in place.
  13. Eat another Chocolate Snowball.
  14. Cut four long, narrow strips of cardboard, slightly taller than your house and tape them together to form a chimney.
  15. Secure the chimney to the side of the house.
  16. Let the dog out.
  17. Let the dog in.
  18. Cut a large rectangle out of strong cardboard for your base.
  19. Use masking tape to secure the house to the base on all sides. (fig 2)
  20. Eat a Thumbprint cookie.
  21. Gather all of your decorative candies, unwrap them and arrange them in separate bowls.
  22. Sample each kind of candy for quality control.
  23. Mix up one batch of ornamental icing at a time (4 c. powdered sugar, 3 T. meringue powder, 1/3 c warm water--whip until stiff peaks form).
  24. Taste icing.
  25. Find soda to get rid of icing taste.
  26. Apply icing to one panel of the house at a time and stick your candies on in the desired patterns.
  27. Stop after two panels to make lunch for the kids.
  28. While you're eating lunch, take a look at Ryan's Gingerbread Barn (hereafter to be known as the RGB).
  29. Decide that your project is a poor cousin to the RGB, but hey, you've got three little girls helping you and by gum, you're going to finish anyway.
  30. Console yourself with the fact that yours will be done in a matter hours, whereas the RGB has taken days.
  31. Make new batch of icing to replace icing that has hardened in the bowl.
  32. Give child instruction to hide the jelly bellies from you before you eat them all.
  33. Frost and decorate 1 1/2 panels.
  34. Answer door and sign for last package you needed for presents.
  35. Frost and decorate remaining panels.
  36. You are 18 gumdrops short of finishing even though you swear you didn't eat any of those.
  37. Call husband to have him pick up more gum drops on his way home.
  38. Save glob of icing to finish gumdrop border later.
  39. Pass out on living room floor in Sugar Coma.
  40. Blog about it.
M's idea was to build a new piece each year until we have a village. Needing to save them from year to year is part of the reason we used cardboard instead of gingerbread. I'm also working with kids who don't have the patience or delicacy to work with real gingerbread. My college roommate and I made gingerbread houses in our dorm room without the aid of any kitchen facilities using the cardboard method. I have been sold on it ever since.

fig. 1
fig. 2

The gingerbread boy and girl have been part of our decorations for years. They fit perfectly.
My rosemary trees are pretty pathetic. At least I had the presence of mind to install short straw sockets for them before I frosted the base so I can replace them easily.

Tuesday, December 22, 2009

Christmas Cookies

Your house is probably much like mine around the holidays. There are just certain activities, recipes and other traditions that make the season for your family and friends. Without them, it just doesn't feel right.
I'm guessing that cookies are probably one of those traditions. For us, there are four must-make recipes. Any others are welcome, but just nice extras. The Thumbprints, Almond Butter Cookies, Chocolate Snowballs and Maple Walnut bars are not optional.


Thumbprints

1/2 c. shortening
1/2 c. softened butter
2 eggs, separated
1 t. vanilla
2 c. flour
1 /2 t. salt
1-1 1/2 c finely chopped nuts

Preheat oven to 350*. In a medium bowl, whisk flour and salt. In a large mixer bowl, cream shortening, butter, sugar, egg yolk and vanilla. Slowly add flour mixture. In a small bowl, beat egg whites until foamy but not stiff. Roll dough into walnut sized ball, dip in egg white and roll in nuts*. Place 1" apart on a greased cookie sheet. Make a depression in center of each ball with your thumb. Bake 17-20 minutes, or until they begin to brown. Cool completely and fill the centers with buttercream icing.
*I'm going to share my trade secret for not making a complete mess at this stage. Get your materials closely lined up: egg white near your right hand, dough in front of you, nuts near your left hand and cookie sheet at your left side (or reverse it if you want). Use just your palms to roll the dough balls and drop them about four at a time into the egg. Then use only your right finger tips to coat them with the egg and drop them into the nut bowl. Then use only your left finger tips to roll them in the nuts and place them on the cookie sheet. By assigning a specific task to each part of your hands, you will keep from polluting each step with the others. You'll be able to finish quickly and not spend half the time washing your hands.

Buttercream Icing

5 1/3 T. softened butter
1/4 c. milk
1 t. vanilla
dash salt
4 c. powdered sugar
food coloring paste (made by Wilton-liquid FC works, but you will need much more to get the desired color. Pink is for Valentine's Day.)

In a small mixer bowl, beat butter, milk, vanilla, salt and food coloring until smooth. Gradually add powdered sugar until icing reaches desired consistency. You will want it to be a little stiff. After you fill the thumbprints, let the cookies sit out until just the surface of the icing dries so that it won't stick to your plastic wrap.

Almond Butter Cookies

3/4 c. sugar
1/2 c. butter, softened
1/2 c. shortening
1 egg
1 T. light corn syrup
1 t. almond extract
1/2 t. salt
3 1/3 c. flour*

Cream sugar, butter, shortening, egg, syrup and extract. Gradually add salt and flour and mix until just combined.
Now you have options. You know those clay cookie molds like the Brown Bag Cookie Molds? This dough works really well with them. Follow the mold instructions. Bake at 350* until the edges just begin to show a hint of browning.
You can also roll this dough out and make cut out cookies. Or you can use it in a cookie press. *If you use a cookie press, cut the flour down by about 1/2 cup so that the dough is soft enough to use with the press. I'm partial to the cookie press. What slacker wouldn't be?

Chocolate Snowballs

3 c. flour
2/3 c. unsweetened cocoa powder
1 c. softened butter
2 c. sugar
2 t. vanilla
2 eggs
1 c. powdered sugar

Preheat oven to 325*. In a medium bowl, whisk together flour and cocoa. In a large mixer bowl, cream together butter, sugar, vanilla and eggs. Slowly add flour mixture and blend until dry and crumbly. With your hands, work the dough until a ball forms and the sides of the bowl come clean. Roll the dough into small balls and place 1" apart on an ungreased cookie sheet. You should get 4 1/2-5 dozen cookies. Bake for 16-18 minutes, or until outside of dough is dry but inside is still soft. Cool on pan. While just barely still warm, roll the cookies in powdered sugar. Try not to eat them all in one sitting.

Maple Walnut Bars (These are DH's personal favorites.)

2 c. flour
1/2 t. soda
1/2 c. light brown sugar
1/2 c. softened butter
1 c. real maple syrup
1 egg
2 t. vanilla
1 c. chopped nuts

Preheat oven to 325*. In a medium bowl, whisk together flour and soda. In large mixer bowl, cream together sugars, syrup, egg and vanilla. Add flour and blend until just combined. Pour into greased 8x8 inch pan and bake 45-50 minutes, or until it tests done with a toothpick. Cool completely and then frost. Store in fridge.

Maple Frosting

1/2 c softened butter
2 oz. softened cream cheese
1 T. brown sugar
3 T. maple syrup
6 T. powdered sugar

Cream all ingredients in a small mixer bowl and frost bars.

Snickerdoodles

1 c. shortening
1 1/2 c sugar
2 eggs
2 3/4 c. flour
2 t. cream of tartar
1 t. baking soda
1/2 t. salt

4 T. sugar
2 t. cinnamon

In a mixer bowl cream together shortening, sugar, and eggs. In separate bowl, whisk flour soda, salt and cream of tartar. Don't make the mistake of thinking the cream of tartar is optional unless you want nice little concrete circles on your cookie tray. Gradually add flour mixture to sugar mixture and blend well. The dough will be crumbly. With your hands, work the dough until it forms a ball and the sides of the bowl are clean. Wrap dough in plastic wrap and refrigerate for an hour or so. When chilled, form walnut sized balls of dough and roll them in cinnamon and sugar mixture. Place 1 1/2 " apart on ungreased cookie sheet and bake at 400* 8-10 minutes. You do not want them to brown.

**Just in case you're wondering, these are all handwritten recipes in my very own personal stash, and therefore fair game. ;)

Monday, December 21, 2009

Snow Machine

The Slacker in me loves to decorate with snowflakes. Sure they're pretty and festive, but they are also easy to store and you don't have to take them down until some time in March or April.
A number of years ago I stumbled across Dave's Snowflakes, bought the disk and have been cutting snowflakes ever since.
They cover our tree, hang from a huge mobile in our two story foyer (which the girls think is funny because it's a snowmobile) and are sprinkled throughout the rest of the house. When we're done with them, the whole stack stores easily in a manila envelope.
Another benefit is that the project is easily transported. I have a ziploc with a stack of pre-printed patterns and some scissors handy and can take it with when I know I'm going to be sitting in the dentist's office or riding in the car. Just fold and snip away, dropping your scraps into the bag.
Every year I try to add a couple dozen new flakes to the mix. It's fun to curl up in front of the fireplace and make snowflakes with the girls will we listen to books on tape or watch favorite holiday movies. And the best part? If you make a mistake, it's only paper.

Saturday, December 19, 2009

Candlemaking for Dummies

After the not so successful attempt with the wax earlier this week, we decided that we needed to find a project that we could do. Ta-Da! Button Candles:

This project was also in the Gooseberry Patch Christmas books (book 3, p. 39) and I am happy to report that they were easy and fun.
What you need:
  • Pillar candles
  • buttons
  • glue dots (the book recommends hot glue, but neither I nor my 7yo are allowed to use a hot glue gun)
  • wire cutters
We already had a jar of buttons that we found at an antique store a while back. That jar has provided hours of entertainment for us. It is so fun to sift through them and make up stories about where they might have come from and the people that could have worn them. I highly recommend trolling the antique stores for collections of old buttons. They have so much more character than the newer ones.
The rest is simple. Put glue dot on button and then put button on candle in a random unpattern. M made the green and red one without any help from me.
Some of the buttons had a raised loop or hook on the back. I used a pair of jewelry wire cutters to clip that off so that they would be flat. If you do this, please be careful and take the proper precautions. I don't want to hear about anybody shooting their eye out with a ricocheting button.


**Wake up call**
On a personal note, the GBP comment yesterday made me curious and so I did some digging via Google Analytics, etc. I made a startling discovery too. People do read this blog. And I'm not just talking about my mother and a couple of letterboxing friends. While I'm not sure why, a surprising number of people are paying attention.
That is both thrilling and terrifying. No author writes in public and prays that no one ever reads it. This humbling realization means that I need to be more responsible though. So this is me...being responsible. Over the holidays I have posted a number of recipes that were not mine to post. For that I apologize. I have removed a number of posts and will be more careful in the future. The last thing I want to do is go to jail for an appetizer.

For those of you who really wanted those recipes, but didn't write them down in time, all I can say is "Buy the Gooseberry Patch books. They are completely worth it!" I have been disappointed occasionally, but it is almost always my own fault.

Friday, December 18, 2009

How NOT to Make Candles

Yesterday I mentioned that we made the tags in the middle of another adventure. That was our first attempt at candle making. I think I have recovered sufficiently enough to be able to talk about the experience.
What didn't work:
  • Buying the 10# glacier of paraffin at Hobby Lobby. My attempts to break it into manageable chunks with a chisel and hammer would have given Martha Stewart heart palpitations. I was considering the reciprocal saw at one point.
  • Using the wax dye to color the paraffin.
  • Using a pyrex bowl to melt the wax in since we didn't have a metal coffee can. (Do they even sell coffee in metal cans anymore?) Pyrex bowls don't pour very well. In fact, Pyrex bowls pour just about everywhere except where you want them to.
What did work (or would probably work):
  • Buying the smaller packages of Gulf Wax. It would likely cost more, but be much easier to work with and involve less bruising.
  • Lots more dye.
  • The metal coffee can. Crimping a pour spout in the rim first would be a great idea too.
  • The pine needle essential oil smells great. In fact, my kitchen floor will smell good for a long time to come.
  • Allowing about four times longer for the project then you think it will take.
  • Buying your candles from Pier One.
Our first project was Pinecone Firestarters. Tie a wick on a pine cone and dip it in melted wax several times. How hard could that be?
No comment.
These were the pinecones we made.

These were the pinecones in the Gooseberry Patch Christmas book. I'm going to go out a limb and guess that I don't have much of a future in candlemaking. It remains to be seen if they will start a fire or not. And will the wax leave residue in the fireplace?
My biggest question however involves the warnings on the paraffin. They went to great lengths to inform you that you should not, under any circumstances, not ever, no we mean it, never use the paraffin near an open flame (which we didn't). And yet the product is labeled for use in making candles; which by their very nature involve open flames.

I think I'm going to stick to sharp, pointy objects from now on.

Thursday, December 17, 2009

Tag It!

In the middle of another adventure today, M and I made lots and lots of gift tags using the snowflake stamps (and about every other craft media that we could drag out.) Here are a few of the successes:
We stamped a silver snowflake on dark blue paper, mounted that on a kraft brown square and covered it with a piece of shimmery vellum. The curls are pipe cleaners.
The tag in the center is much cooler than the photo can show. We used a large snowflake punch on the blue paper and then mounted that on white background paper. We filled the center with an iridescent powder and embossed it. Since the center of the snowflake just had glue stick gel in it and not embossing ink, the result looks like tiny drops of wet mist.
The tag on the left is the snowflake punch cutout on white stamped paper on tan background. We took an 8 1/2 x 11 sheet and stamped a random pattern of different colored flakes on it and then cut it into squares with decorative scissors.
The tag on the right is the same stamped paper mounted on blue card stock and embellished with cute little snowflake buttons that were in a mixed bag that we found by sheer serendipity the other day. I asked the lady restocking the shelves at Michael's if they had any Christmas buttons and she handed the bag to me out of her cart. It was the only one in the store.
See, more of those buttons from the accidental find. For all of the tags we stuck to a color scheme of dark blue, light blue, silver, white and kraft brown.
These are my favorites. We stamped a silver flake on some paper scraps that we had (they have dark blue felt-like patches) and mounted them on slightly longer strips of dark blue. Then I used the same five stitch binding technique that I use on my logbooks and attached tiny jingle bells with silver embroidery floss.
These were our warm ups this morning. A silver stamp and a fun button on white and dark blue paper.

Now I'm wondering if it would be tacky to ask the recipients if I could have these back after they open their gifts so that I can use them again next year. ;)

Wednesday, December 16, 2009

The Pumpkin Anthology

Have I told you lately how much I adore Pumpkin? I've already posted the recipe for Pumpkin Ice Cream Pie and Pumpkin Stew. Here are a few more:

Pumpkin Coffee

Brew your coffee as usual. To each mug of hot coffee, add one teaspoon (or more to taste) pumpkin puree and a tablespoon or so of eggnog (regular or vanilla spice).

Pumpkin Pie
Not all pumpkin pie is created equal, so I'm posting our recipe.

Single crust for 9 inch pie
1 c. canned pumpkin
1 c. sugar
1 T. flour
1/4 t. ground cloves
1 t. cinnamon
1 egg
1 c. milk

Roll out crust and place in pie plate. Combine remaining ingredients and mix well. Pour into pie shell and bake at 400* for 10 minutes. Then reduce heat to 350* and continue baking 50 minutes longer, or until center is set. If a skin forms, you baked it too long.

Pumpkin Cake

4 eggs
2 c. canned pumpkin
2 c. flour
1 t. cinnamon
2 c. sugar
3/4 c. melted butter
2 t. baking powder
1 t. soda

Combine all ingredients and mix well. Pour into 15x10 inch jelly roll pan and bake at 325* for 15-20 minutes or until it tests done with a toothpick.
Frosting:
3 oz cream cheese, softened
3/4 stick butter, softened
1 t. vanilla
1 t. milk
3 c. powdered sugar

Beat first 4 ingredients until well blended. Blend in one cup of powdered sugar at a time until desired consitency.
*According to my DH, I could put this frosting on shoe leather and he'd eat it.

Pumpkin Pancakes

2 eggs, beaten
2 c. buttermilk
2 T. sugar
2 t. baking powder
1 t. baking soda
1 t. salt
1 c. pumpkin
2-3 c. flour

In a large bowl, combine first 7 ingredients and blend well. Add flour one cup at a time until batter reaches desired thickness. Bake on hot griddle as usual.
*You may find it helpful to lower the temp on your griddle ever so slightly to allow the pumpkin to cook through.

Pumpkin Doughnuts

3 1/2 c. flour
1 T. baking powder
1 t. baking soda
1 t. salt
1/2 t. cinnamon
1/2 t. ginger
1/4 c. softened butter
3/4 c. sugar
2 eggs
2/3 c. pumpkin
2/3 c. buttermilk

For topping
1/2 c. brown sugar
1/2 c. white sugar

In a large bowl blend together first 6 ingredients. In a mixer bowl, cream together butter, sugar, eggs, pumpkin and buttermilk. Slowly add flour, mixing well. Store dough in airtight container overnight. Roll out dough on floured surface to just under 1/2 inch thick. Cut out doughnut shapes and let rest 10 minutes on floured surface. Heat oil in large skillet and cook doughnuts until golden on both sides, about 3-5 minutes.
Combine sugars in a bag. While the doughnuts are still warm, place them in the bag and tumble them until coated.

Pumpkin Butter

3 1/2 c. cooked pumpkin
1 T. pumpkin pie spice (or 1 tsp each cinnamon, ginger, nutmeg)
1 3/4 oz powdered fruit pectin
4 1/2 c. sugar

In a heavy saucepan, combine pumpkin, spice and pectin; mix well. Bring mixture to a low boil over medium heat. Immediately add sugar and mix well. Bring to a rolling boil and cook 1 minute, stirring constantly. Remove from heat and ladle into jars. Store 2-3 weeks in fridge or freeze. Makes about 5 1/2 cups.
*I'm going to try a slow cook version of this in the crock pot without the pectin.

Pumpkin Bread

16 oz can pumpkin
1 2/3 c sugar
2/3 c. vegetable oil (I usually use olive)
2 t. vanilla
4 eggs
3 c. flour
2 t. baking soda
1 t. salt
1 t. cinnamon
1/2 c. ground cloves
1/2 t. baking powder
1 c. nuts, optional (not for me, thanks!)

Surely you know how to mix ingredients by now?! 2 greased loaf pans. 350* 50-60 minutes or until toothpick comes out clean.

Pumpkin Spice Cookies

2 1/2 c. flour
1 t. baking soda
1/4 t. salt
2 t. pumpkin pie spice
1 c. dark brown sugar
1/2 c. white sugar
3/4 c. butter, softened
1 egg
1 c. pumpkin
1 t. vanilla
1 c. raisins, opt.
1/2 c. chopped walnuts, opt.

Preheat oven to 300*. Combine flour, soda, salt and spice in a bowl. In mixer bowl cream butter and sugars. Add egg pumpkin and vanilla and blend well. Slowly add flour mixture and mix until just combined. Add raisins and walnuts if you must. Drop by rounded tablespoons onto ungreased cookie sheets and bake 22-24 minutes until cookies are slightly brown along the edges. Cool on wire racks.

That should do it. Any more and even I will be sick of pumpkin.

Tuesday, December 15, 2009

Bag It!

One of M's first projects with the snowflake stamps was to create some gift bags. While we have an overabundance of wrapping paper, the only bags we have are for girlie baby showers. So, we made a few to use for packing our Christmas baked goodies.
Blue, white and silver snowflakes finished off with a dusting of light blue spatter painting (which doesn't show up very well in the photo) and the bags are ready. The surprise was that my messy little crafter did not like the spatter painting.

*On a stamping note, we had purchased a super cheap silver embossing ink pad from Michael's to use on the bags (Craft Smart pigment). While I have not tried it for embossing, it did not work very well for our purposes. The ink is very oily and the oil bled into the paper around the stamp image. It also never completely dried in spite of my taking a heat embossing gun to it. The pad was very juicy however and the ink cleaned up nicely with the Staz on stamp cleaner.

Monday, December 14, 2009

Project Blizzard

The books by Laura Numeroff in the If You Give a Mouse a Cookie series are some of our favorites. They are perfect illustrations of the Sequences that I mentioned earlier. Our own edition began when I made the mistake of giving my crafty child the Gooseberry Patch Christmas books some weeks ago. She now has a list for me that will take until August to complete.
At the top of that list was her desire to make our own wrapping paper this year. To that end, I began carving...
In the meantime, about a dozen rolls of Christmas paper were discovered in the basement. No worries though. We have already dreamed up several other messes that we can make with the stamps. Stay tuned...

Friday, December 11, 2009

A Quick Favor

I have a quick favor to ask of my readers.
I am currently working on building a new website for our church using only interlinked blogs. Why? Because I'm curious to see if it can be done. That and I'm bored. Ha!

I've installed Google Analytics to each page and I'd like to make sure it works. The easiest way to do that is to have people from different regions click through the site. Would you mind visiting the site for me? You can find it here: Somonauk Baptist Church. There isn't much to see yet, so it shouldn't take long at all.

Thanks ever so much!

Tuesday, December 8, 2009

I can do that...

In an email from Chris Baty (the founder of National Novel Writing Month):

"Well, you rocked it this November. I hope your NaNo recovery process has been going smoothly, and that you're now knee-deep in celebrations that will prevent you from attending to any work tasks, school duties, or household chores for a long time. (Remember: NaNoWriMo winners do NOT do their own laundry. It sets a bad precedent.)

See? I'm just following orders.

Norwegian Lefse


To a certain extent our Christmas baking, at least the Norwegian part of it, is a mild Sequence. (If you are unaware of Sequences, you need to find a copy of Patrick McManus' book The Night the Bear Ate Goombaw and educate yourself.) We need 1/4 c. of Whole Milk to make Potato Cakes. Nobody sells milk in 1/4 c. containers, and so we are left with nearly a half gallon of milk that no one in this household will drink. So there is nothing to do but make Lefse with it.

What is Lefse, you ask? It's a Scandinavian tortilla that you fill with Salt Cod, potatoes and melted butter for Beitas on Christmas Eve. Or spread them with butter and dust with sugar like the potato cakes. Are you beginning to sense a theme here? You can do what you like with them, as long it involves Butter. You get bonus points if you include potatoes with the butter.

In order to make Lefse, you will need some special equipment, as follows:
  • A Lefse Grill--an oversized electric griddle. Lefse griddles are larger. They also have no sides.
  • A specialized rolling pin--the surface is carved into tiny squares. (mine is only parallel lines, not squares, but I can live with that.)
  • A Lefse Stick--Every Norwegian community seems to have stories floating around about Somebody's Great Grandmother using the stick out of the bottom of a roller shade when the real thing wasn't available.
  • Extra large new pizza boxes--Pizza boxes?! Of course. You have to store the Lefse in something when it's finished.

The recipe:
Four, Two and a stick. Well, that 's how I learned it anyway. Let me 'splain.

4 c. flour
2 c. whole milk
a stick of butter (this should be no surprise by now)

I should note that there is also Potato Lefse, but that's a different recipe. We'll do basics first.

Measure flour into a large bowl. In a heavy saucepan, heat milk and better until it begins to steam. Turn off heat and pour milk over flour. Mix with a spoon until combined and then knead with your hands until smooth. It will be very hot, so be careful. (Actually, this is my favorite part. By the time I make the Lefse, I've usually already done quite a lot and the heat feels good on my aching hands.) Form into a 13" log, wrap in plastic wrap and set aside.
Taking one inch at a time, roll out on a lightly floured surface with the Lefse rolling pin until you have a large circle (Much heated discussion has taken place over the merits of circle vs. square Lefse. Essentially, circles are prettier, but squares are more functional. Mine tend to look more like the continent of Africa.) You want it thin enough to be able to read through...almost. As you roll, alternate the direction of your motion, so that the pattern on the rolling pin goes every which way. You will also want to flip and re....

Oh, forget it. The only way you're going to learn how to do this properly is to come to my house and let me teach you. I'm pretty sure that if I haven't lost you yet, I certainly would when we got to the part about hanging it on the stick. And I'd never be able to digitally translate how to soak them.

Det blir alltid plass til ein velkommen gjest.
So when are you coming?

Monday, December 7, 2009

Christmas Kitchen II

The King's Singers and Mannheim Steamroller are playing on the stereo today. A quick re-read of the last post tells me that I need to tone down the sugar a notch; which is unfortunate since we made Cashew Brittle today*.

But first we'll do the Potato Cakes we prepped for yesterday. In the middle of all the rest of the projects yesterday, I peeled, cooked and mashed potatoes. I should note that this is the only recipe in my kitchen for which I ever peel potatoes. Here is the rest:

Potato Cakes

8 c. cooked, mashed potatoes
1/4 c. whole milk
2 t. salt
1 stick butter

In a large bowl, add milk, salt and butter to potatoes and mix well. Cover and refrigerate overnight.

2 c. potatoes
3/4 c. flour
1/8 t. baking powder

One batch at a time, mix cold potatoes, flour and baking powder until thoroughly combined. Dough will be very sticky. On a well floured surface, roll dough to 1/16th inch thickness. Cut 6 inch circles (I use a sherbet lid. Sophisticated, huh?) and cook on a hot griddle (400* or so) until golden brown spots form. Flip and repeat on other side.
You need to work fast to get the dough rolled out while it is cold. As it warms it will be harder to work with unless you use a lot of flour. Too much flour can make them tough though. I find it useful to keep a pastry brush handy to brush off excess flour before cooking. Once the circles are cut and moved from the rolling surface, however, they can sit for a little while until there is room on the griddle. Electric griddles work better than stove top. If this is your first time making these, I highly recommend that you have a second person there to man the griddle, so you can concentrate on rolling. Once you get the hang of it, you will be able to coordinate rolling and flipping.
If you are not covered in flour from the waist up when finished, then you didn't do it right.
To serve, spread a thin layer of butter on a warm potato cake and heavily dust with sugar and tri-fold them. You did know this was a Norwegian recipe, right? They work equally well when used in place of a tortilla and stuffed with ham, scrambled eggs or whatever else you can find.
You should get 45-50 cakes out of this, with about 1/2 c. of extra potatoes left over.
They freeze well, but you will need to put a layer of wax paper in between each one as you stack them. The wax paper isn't necessary if they are just going in the fridge.


Evil Cashew Brittle

1 c. butter (Not margarine!)
2 T. light corn syrup
1 c. sugar
1 1/2 c. cashew halves

In a heavy saucepan, bring butter, syrup and sugar to a boil. Over medium heat, boil 5-6 minutes, stirring constantly, until candy thermometer reaches 300*. Remove from heat, stir in cashews and immediately spread on greased parchment paper on a baking sheet. Cool completely and break in pieces. Store in an air tight container. You can double this recipe, but any more than that and it becomes too difficult to spread out before it hardens.

*In this case today isn't actually today. My posts are slightly off kilter with reality, so what I'm writing about happened on Friday.

Saturday, December 5, 2009

The Christmas Kitchen

Now that Nano is over, I am finding myself in need of something to keep from going into writing withdrawal. I don't really want to start editing until January.
Soooo...after schoolwork was done for the day (I'm writing this on Thursday), we converted the kitchen into Christmas mode. I had done some serious grocery shopping on Monday and now the cupboards that are packed like a South American bus. We had to set up a card table to hold all of the extra baking supplies.

There are just certain recipes that have to be made this time of year; whether as part of our gifting traditions for specific people or "just 'cuz". I think it's cute, but every year the guys that DH works with send home a stack of empty tins. No note. No instructions. Nothing but the implied request to "please, pretty please fill these with something yummy?" Cashew Brittle and Fudge are the stand by recipes that I make for them.

Today, we plugged Christmas with the Rat Pack and A Looney Tunes Christmas into the stereo and made one gigantic recipe of Multigrain Pilaf (which will serve our supper needs for weeks to come), one batch of Cider Cranberry Sauce, Two 9x13s of Fudge, and the 8 cups of mashed potatoes for the Potato Cakes that I intend to start tomorrow. We also broke in the shiny new 7 1/2 quart color coordinated brick red Crockpot with a batch of Potato Soup.

Recipes? I thought you'd never ask!

Multigrain Pilaf

16 cups water
16 cubes or 1/4 c bouillon, if desired
1/2 c. dry Oats (not Oatmeal)
1/2 c. pearled Barley
2 c. Brown Rice
2 c. Wild Rice
1/2 c. Amaranth
1/2 c. Quinoa
1/2 c. Buckwheat

In large stockpot, bring seasoned water to a boil and add Oats. Simmer 20 minutes and add Barley. Cook 5 minutes and add brown and wild rice. Cook 10 minutes and then add Amaranth. Continue cooking 5 minutes and then add Quinoa. Cook 5 more minutes and then add Buckwheat. Cook 15 minutes or until grains are tendier. Add additional water in small amounts if necessary. Drain any extra water. Cool completely, divide into containers and freeze. This makes about 24 cups of Pilaf, but it freezes very well. If you choose to cut the recipe in half, cut the amounts, but not the cooking times.

Cider Cranberry Sauce

6 c. fresh cranberries
1 1/2 c. cider
1 1/4 c. sugar
4-5 long strands of orange zest
2 t. lemon juice

In a non reactive saucepan, bring all ingredients to a boil. Lower heat to a simmer and cook 10-12 minutes. Cool and store. Or you can eat it. It's your choice. Goes especially well with ham. Or ice cream.

Fudge

1 c. butter
1 c. milk
4 c. sugar
12 oz semi sweet chips
12 oz Brach's stars (if you can't find them, use milk chocolate chips)
2 squares unsweetened chocolate
18 large marshmallows
1 c. nuts, optional

In a reinforced saucepan, bring butter, milk and sugar to a boil. Remove from heat and pour over remaining ingredients (you might want to put them in a bowl first). Stir until your arm falls off or the marshmallows are completely melted, whichever comes first. Pour into a 9x13 pan and cool overnight. I got smart this year and let my Kitchen aide do the stirring. This is supposedly the Fannie May fudge recipe, but what are the odds?

Potato Soup

6-8 potatoes, cut up
carrots and celery (specific, huh? Well, I use about 2 c. of each)
1 large onion, chopped
1 can cream of chicken soup
1 quart chicken broth
2 c. milk
1/2 stick butter
4 slices bacon, cooked and crumbled (Eh, why not? Throw in the whole package.)
1 container sour cream (I'm guessing it's the small container. What do you think?)

Throw all of it, except the sour cream, in a large crock pot and cook the begeebers out of it. Add the sour cream before serving. Cheese is good too; but isn't it always?

Friday, December 4, 2009

Cruise Reservations

This page, created by Mrs. Doglvrs, is such fun that it is the perfect end to our fantasy tour.
The tag at the top of the page has the words to Johnny Horton's "North to Alaska", which we will now all have stuck in our heads and which will make us all want to watch the movie, right?

Now I just need to see if I can twist some arms and get some of the other participants to post their completed books. At one time there was a yahoo group just for this project, but I don't think it exists anymore.

Thursday, December 3, 2009

Reservations in Time

Very clearly, Heysukeyw is on a whole other plane of crafting existence than I am. In fact, I can't hold a candle to most of the participants of this round robin. First of all, she really took the "no limits" to heart and is taking us on an incredible journey back in time to visit with her Foremothers; a concept which I adore. To have even one day with the dear women of my past would be a treasure far beyond worth. But before we all need a tissue...
The depth of the colors and layers on this page are a feast for the eyes. Everything from the alien time machine to the burnt paper edges is genius. Do you notice how the flowers on the pocket line up perfectly with the flowers on the background making the transition seamless? Such attention to detail!
This tag with the wonderful old key pulls out of the pocket.

We'll head back to reality for one last trip tomorrow.

Wednesday, December 2, 2009

Reservations for Hawaii

I am pretty sure that if I ever got to visit Hawaii you would never, ever get me on the plane home. We have family in Hawaii and personal connections to the Islands in spite of never being there in person (that's another story). Which means that I LOVE everything about CW Sunseeker's addition to my logbook. The colors are fabulous and there is so much to look at! I could just lick the pages, they're so delicious to see!
Postage stamps, rubber stamps galore, tags with logos and miniature travel posters clutter the page. And when I say clutter, I mean that in a good way.

The mini Aloha postcard on the left opens into the postage and coin/sig stamp in the lower right corner of the picture above. The two "tea bags" open and are full of the little souvenir and tourist gear cards (which were stamps from the favorite vacations PLB ring).

**Sigh**

Tuesday, December 1, 2009

Reservations for Texas

Wild Hair presents a rather unique opportunity for us today: Bird watching in Texas with artist Lars Jonsson. This would be a dream come true for me as well...as long as I could take my Dad with me. Every other place in the world I would choose to visit with my DH and/or my girls. However, on a bird watching trip, both children and husband would get caught picking wax out of their ears in boredom, and so I'd rather go with my Dad, who would actually enjoy the trip and be able to contribute more than just "Yep. That's a bird."

The card with Lars' picture on it folds out accordion style to show some of his work in miniature and the details of the tour. The back of the card (not pictured due to techinical difficulties) is vellum and says "The first step is the dream" in black script.